Thursday, September 20, 2012

Summer is Over - and I'm Building Again

It's been a long and lovely summer without much attention spent on this project, but a few days ago I got back into the Prusa Mendel.

I contacted the man who sold me the plastic parts, and got a better understanding of how he intended them to be put together, as well as what other parts to order. Since then I've gotten the pulleys for the belts, and a heated bed for the machine.

With these parts in hand I felt ready to continue with my building, and I assembled the X-axis carriage. I even recorded that assembly, so here you go:


That was 2 days ago, and yesterday I disassembled much of the machine to add a new, clever idler-holder for the Y-axis belt that the seller explained to me how to do. After doing this I felt so happy with myself and the progress that I kept on going and put the plate on the smooth-rods.

I've been going back and forth on what kind of plate to use, and whether or not to use a heated bed. I did get hold of some MDF for the two beds I initially thought I'd need, but that material was very thick and would cost a lot of vertical room. I finally ended up buying a small sheet of aluminium, and cutting it to size. This is what I mounted on the smooth-rods yesterday using linear bearings. Have a look at this beauty:


I addition to being really thin it's shiny! I do like shiny stuff. On top of this I'll mount the heated bed, and that'll be my printing surface done!

It's really coming together :)


Tuesday, July 3, 2012

It's Been a While

It's been a while since my last update, apologies for that. Truth be told not a whole lot has been happening. I've been too busy with work and family to really devote any meaningful time to the Prusa. In between all the other stuff I've gotten the Y-axis mounted and I've got the lower plate fixed to some linear bearings on the rods.

After that I started mounting the motor for the Y-axis belt, and attached what I thought was the cog for driving that belt. While doing so I noticed that the cog (or pulley, as it's called I've since learned) was a bit smaller than the one in the drawings, and there was only one in the set of plastic parts I'd gotten. Since both the X and the Y axes are driven by belts and the extruder is also driven by a cog I'd expect three cog-wheel -thingies.

I contacted the guy who sold me the parts, and he elucidated: It turns out that driving the belts with printed pulleys is old-school and to error-prone and imprecise for good prints. Therefore the guys in the know have started using machined aluminium pulleys to operate the belts. He'd mentioned that I need to purchase belts and pulleys, but I didn't understand that at the time.

So, I've ordered some more parts from xyzprinters and will  mount these as soon as they appear. I've been slightly disappointed with their delivery-times earlier, but now they've apparently switched to a new deliverer in Norway, I hope these ones are quick!

Here's a picture of my mismounted motor - this one will now be driving the extruder, not the Y-axis belt as its currently set up to do.

The guys in the know (I really must start hanging out on the irc-channels more) also told me that building the Prusa with a lower and an upper bed is no longer the standard way of doing things. With the printed parts I've got I can make do with just the upper bed, as there are some tall brackets that can hold the belt securely without the lower bed. The things one learns...

I've also finally gotten the hot-end delivered from hotends.com, that I ordered when I started this journey back in the beginning of May. It took 2 whole months to get here - but arrived in one piece and given that I've not yet needed it I don't much mind! Here's a picture of it on the packaging it arrived in:

That's it for now! I'll be starting on taking off the lower bed (which I no longer need) and removing the attached motor shortly. Two steps forward, one step back.

Monday, June 11, 2012

Vertically challenged

My, my don't I feel silly. I've got a couple plates that are simply too thick. I was so happy that I got them I neglected to check which sickness they should have been. They turned out to be about 2 centimetres thick, and this would steal a total of 4 centimetres vertical print space. This is totally unacceptable. I will have to get a new lower plate cut from  a finer plate, and I think I will splurge for a heated bed.

Here are some pictures of the plates as they are today:


Saturday, June 9, 2012

MDF

I made a decision on the print-bed: I'm going with MDF for now. I drove over to the local hardware-store (getting rear-ended on the way, but that's another story) and described the dimensions of the plates I needed. They just laughed at my puny plates and cut them out for me and gave them to me at no cost! Sometimes small things really are better...

I'll get back to the building later tonight, stay tuned :)

Friday, June 8, 2012

I've come this far

Hello again! I'm back from a three-day hiatus from my build while on a conference out of town. But I'm back, and I've been busy. I've now gone through the rough positioning of all the rods relative to each other and made sure the frame is now stable and symmetrical. It turns out my eye-measurements are kinda slack, so that was quite a bit of fiddling.

Once that was done I put on the final, bottom threaded-rod that positions the clamps the z-vector smooth-rods will rest in and centred those.

Now I'm at the point where I can start attaching the smooth rods and mounting the bottom plate. Problem is - I've yet to decide on a plate. I'm thinking I may go for MDF for now and take the extra work later on if I want to use a hot-plate. As far as I understand that will cause lower-quality prints due to shrinking while printing. I'm really unsure about what to do here, so I'll apply my favourite heuristic when unsure - I'll sleep on it :)

Here are some pictures of the state it's in so far:

Tuesday, June 5, 2012

That'll Do

This will have to do for tonight, I have to pack and sleep :)


Screw This

Assembly is under way! I've just started and won't get very far this week as I'll be away on a conference the next three days, but it's started!

Monday, June 4, 2012

Cleaning Out the Feet

In which I prove that even double-chins won't hold a mobile reliably :)

Sunday, June 3, 2012

Part: The Parts

It's Here! The parts are finally here! Most of them, anyway :)

Yesterday I got the package from the good fellas over at XYZPrinters. For future reference I ordered the parts on the 2nd of May. 12 days later they started assembly of the electronics and 6 days after that they marked the order as assembled. On the 22nd of May the package was shipped to me from the Netherlands with TNT, and it arrived here in Norway yesterday, the 2nd of June.

My first thought is that if it really took some guys who've done this before 6 days to assemble the electronics I'm relieved I didn't go for the self-assembly :) It's been a month since I ordered it, and finally it's here and I can begin assembly.

I took some pictures of the parts - feast your eyes on these!

With the plastic parts I already had:

And finally with the impromptu assembly-table I made because I need to use my PC and I don't want to move the parts in and out of the cabinets all the time during assembly:

I know I still need some kind of a plate and plastics, and the hot-end still hasn't arrived - but this is exciting! I'll hopefully get to start putting some stuff together tomorrow :D

Tuesday, May 15, 2012

Part: The Waiting

Not much has been happening so far. I'm still waiting for my parts from the guys over at XYZPrinters, but I did get an e-mail late last night telling me that they were starting work on assembling the electronics for me. I hope they're quick about it! :)

Friday, May 4, 2012

A Load off My Mind

I got the message last night that the guys at xyzprinters.com will assemble my electronics before shipping it.

They do charge 50 euros for the service, but just buying a soldering-iron fit for the purpose would probably set me back by that much. Not to mention my soldering skills are sorely lacking, and I'd probably break a lot of things in trying to assemble them myself.

The next time I build something like this I'll look into doing that myself, but not on the first one.

I've been on the lookout for plastic filament as well, and the site over at printplastic.nl seems very nice. To my mind the prices are good as well. If you're going over there's a code for a 10% discount until the 6th of May: NEWSITE as it seems they've just got a new site :)

Thursday, May 3, 2012

The Kit Fantastic

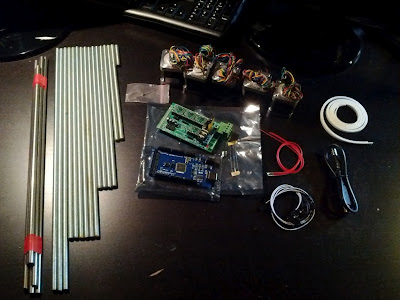
Here's a picture of the parts I've got so far.

This makes me giddy with excitement :-)


Gathering The Components

I've wanted a 3D printer for many years now, and now I've finally gone ahead and decided to build one. I've gone ahead and ordered the parts to build a Prusa Mendel 3D Printer, and I'll chronicle the building of my RepRap here. I hope you'll join me in this adventure!

I bought the plastic parts for it about a week ago, and they have arrived (and look great, thanks to RoTorIT for selling me the kit), and yesterday I finally ordered the rest of the parts (I hope).

So far I've got

  • The plastic bits, with some vitamins added in

I've ordered

And I'll buy screws, nuts and bolts as I go along in the local shops. Now that I come to think of it I didn't order a print-bed, and that might be something I need. I just don't know these things yet, but it'll be fun learning.

I still don't know if I've got all I need on back-order, or if I'm missing anything - it'll be fun (and frustrating) to find out :)

I do hope the parts get here soon, as this is my birthday present to myself and I'd like to get building!

I'll post pictures of the awesome parts I've got soon, and update on the delivery of the parts as they arrive.